Animation has an essential role in video games. Most video games try to simulate real world physics; in order to achieve this objective it is essential to be able to represent, in the most realistic way, the movement of people, cars, animals and objects in general. In this article we will describe some concepts related to animation in video games, with examples of sprite animation with the Unity 2D engine.
1) Animation and object movement
We can define the animation as a change over time of a certain property of an object, for example the position, the orientation, the state of motion, the color, the dimensions, etc. Time, movement and variation of some properties play a central role in any animation phenomenon.
The idea behind the animation is to display a series of images with a fairly high speed, so that the human brain interprets it not as a discrete flow, but as a continuous flow, thanks to the phenomenon of persistence of vision.
The theory of persistence of vision, already proposed by Lucretius (94 – 56 BC) in his work ‘De Rerum Natura’, states that the eye maintains the imprint of an image in the retina for a short time, even after the external stimulus has ceased.
The hypothesis of the persistence of vision has been questioned by other theories, in particular by the hypothesis of the PHI phenomenon proposed by Max Wertheimer in 1912. This theory states that our brain is able to connect empty time intervals in a sequence of static images, giving the illusion of movement. Basically, our brain would have an innate ability to perceive movement and in general to make sense of images even if they are not complete.
For a deeper study of the subject of vision, the following texts can be consulted: [1] or [2].
2) Animation through powerful computers
Time plays a central role in animation and in motion simulation in general. Physical time is the real-world time and is a continuous variable. Computer simulations, on the other hand, manage only discrete data. The graphics pipeline renders images at discrete intervals; in each animation, the properties of the objects change in specific time instants. We can therefore distinguish two types of time:
- real-world time
- in-game time
The in-game time is made up of discrete intervals, managed by the game loop that periodically updates the status of the objects on the scene (for a description of the game loop see the article in this blog). In video games, the images displayed on the scene are prepared by frames that are updated with high frequency, for example \(30\) fps or \(60\) fps (frames per second).
While in the real world time is continuous and we can observe the various events at any particular moment, in video games and in computer simulations in general events occur in discrete moments within frames.
The preparation of each frame requires the updating of the data relative to each object on the scene:
- position
- orientation
- geometric shape
- scale factor
- appearance (color, material, lighting, etc.)
- physical state
- etc.
2.1) Keyframes
We have seen that frames are the places where any change to objects occur on the game scene, although obviously many frames can exist without changes compared to previous frames. Given the huge number of frames, it would be completely impractical to manually define the changes for each of them. Computer animation allows you to define some reference frames (keyframes), which define significant moments of the animation process, and the program automatically generates the animation sequence. A keyframe contains information about position, rotation, scale, etc. of the animated object. For example, in the case of the animation of an automatic bar that controls access to a parking lot, we can define two states, one with the bar lowered and another with the bar fully raised. These two states indicate the beginning and the end of the animation. The graphics engine (for example Unity 3D) employs a mathematical interpolation procedure, then prepares the intermediate frames (tweens), which together constitute a sequence that creates a smooth transition between keyframes.
2.2) Types of animation
There are different types of animations. Some can be created directly in Unity through the Unity Animation Editor product, while others are created through external products, such as Photoshop, Blender, Maya, 3ds Max, Gimp, and then imported into the Unity project. There is also the possibility of creating an animation through the code; in this case the animation is generally not created in advance, but is generated during the game, according to the events.
Animation of a rigid body
In this case an object, for example a door, is considered single and indivisible, with no parts that move independently. The changes relate only to position, orientation and possibly scale.
Skeletal animation
In this type of animation, the movement of the individual components must also be considered. This type of animation is the most used in games. Skeletal animation is an animation technique in which an articulated object (a character for example) is composed of two parts: a surface part (mesh or skin) used to represent the object and a hierarchical structure of interconnected bones, each with its properties. The animation system produces poses (or keyframes) for each bone of the structure and the animation engine connects the various keyframes through an interpolation process. The process of creating the link between the mesh and the hierarchy of bones is called rigging.
Skeletal animation is not limited to the human body, but can be applied to many situations: a car, a spaceship, a soldier, a door, etc.
Sprite animation
A sprite is a bitmap graphic image that is typically part of a larger scene. It can be static or it can be animated. A sprite sequence can be viewed through the frames at a suitable rate to give the sensation of continuous movement.
Animation by morphing
It is a technique for moving continuously from one image to another, transforming the vertices of the initial figure into the final one. In each keyframe of the animation the vertices are placed in different positions, approaching the vertices of the destination image. This animation mode allows greater control over the movement of objects.
Physics based animation
In some situations, physical engine-based animation can produce more realistic phenomena than keyframe-based animation. Unity’s physical engine allows you to efficiently simulate many real-world phenomena, such as the effects of gravity, the presence of wind or a stormy sea, etc.
For further information on the types of animation see [3].
3) Animation in Unity
Unity has an animation system called Mecanim. To manage the animation process, Mecanim uses the finite state machine tool: each state corresponds to an animation and it is possible to define the transitions between the various states. For each transition from one state to another Mecanim is able to perform interpolations between the frames, in order to obtain a fluid and natural sequence. The system also allows you to manage the overlapping of different animations, necessary for complex structures.
Three components are needed to create a GameObject animation:
- an Animator component for the GameObject
- an Animator Controller
- at least one Animation Clip
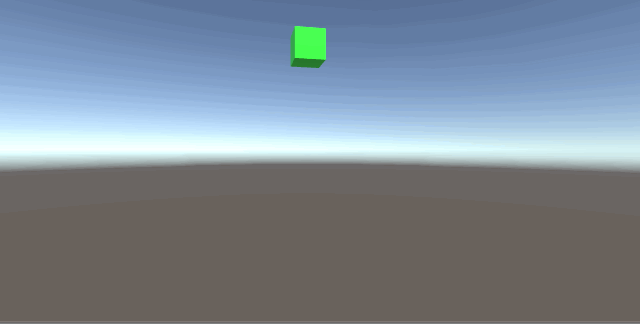
Let’s see, for example, how to create the animation of a single object, changing some of the properties of the object itself: position, rotation, scale or color.
3.1) Creation of an object animation clip
The steps to create a single animation clip are as follows:
- create a new scene;
- create an object (e.g. a 3D cube);
- in the Window menu choose the Animation option;
- click on the Create button and give a name to the animation (file with extension .anim);
- click on the Add Property button. Here you can choose the type of animation specifying the property that must change: position, rotation, scale or the properties of Mesh Renderer (e.g. the color).
When the Create button is pressed, Unity performs several actions. First, it creates an Animator Controller for the object (file with extension .controller). Then, it adds an Animation on this controller. After this, it adds an Animator component to the object, visible in the Inspector.
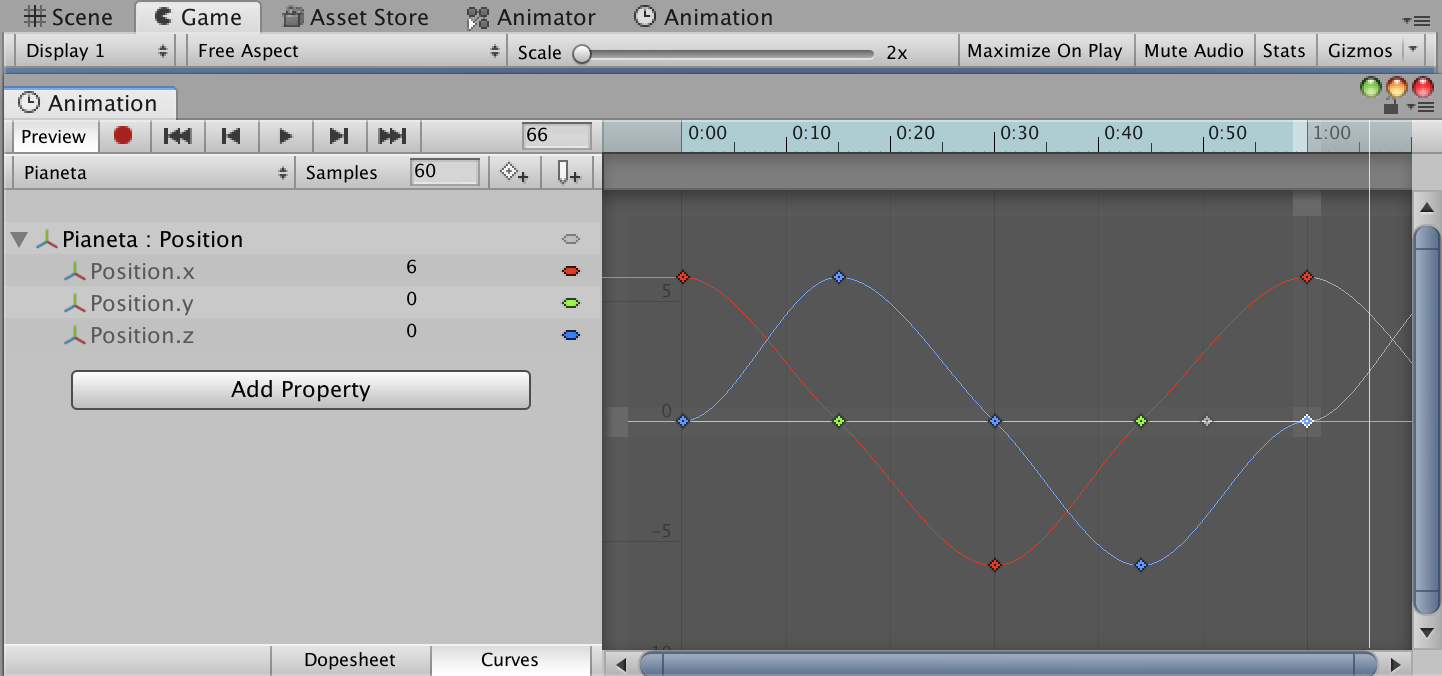
Of course, multiple animations can be defined on the same object. In the following example we can see \(3\) types of animations, with three properties that vary: position, orientation and color.
For more details see the Unity online documentation.
3.2) Dopesheet and animation curves
The Animation Window supports two different operating modes to create and edit the animation clip:
- Dopesheet mode
- Curves mode
In Dopesheet mode it is possible to precisely set the keyframes and the values of the variable properties (position, rotation, color, etc.). The Dopesheet offers a compact view of the temporal moments in which the properties change their value. However, it is difficult to have a precise idea of the values of the various properties in the time intervals between the keyframes.
The Curves mode allows you to have more control over the values of the properties at any time. The Curve Editor allows you to create and edit curves. An animation curve has a plurality of keys, which are animation control points. The animation curves have different colors to represent the values of the various object properties of the animation.
4) Animation of the sprite sheet in Unity 2D
In version 4.3 Unity introduced the possibility to choose the 2D option and added the Sprite object, which contain a bitmap image (Texture2D). A 2D sprite is a graphic image that can be used as a two-dimensional object with coordinates (x, y). A sprite in Unity is defined by a rectangle, a Texture2D and a pivot point.
The sprite can represent a single object or an entire scene. In addition, several sprites can be combined to create a single object.
Sprites can be created directly through Unity or imported into the project assets, and they can be provided with movement. If you open a Unity project in 2D mode, each image imported into the project is assigned the Sprite texture type (2D and UI).
4.1) Sprite Renderer
When a Sprite GameObject is created, Unity also creates the associated Sprite Renderer component, which is responsible for rendering the sprite itself. While in a 3D environment the appearance of an object differs depending on the lighting and the position of the camera, in a 2D space the object is represented without any depth. With the Sprite Renderer it is possible to set various properties such as material, color, layer, etc.
4.2) The sprite sheets
It is often more convenient to record a collection of sprites in a single image. The idea is to create a single image that contains all the animations of an object. This image is called a sprite sheet (or sprite atlas). Unity provides a tool (the Sprite Packer) to combine individual sprites into a single atlas.
An alternative is to draw sprites and create animations with one of the many products on the market (Photoshop, Blender, Gimp, Maya, 3ds Max). In this way you can test and try the animation, simplifying the complexity of the project. Then we proceed to import into the assets of the Unity project by setting the Sprite Mode in the inspector to Multiple. Then, using the Unity Sprite Editor , the individual images are separated in three different ways:
- Automatic
- Grid by cell size
- Grid by cell count
4.3) Animation of a collection of sprites
An easy way to create an animation from a sprite sheet is following these steps:
- import the collection of sprites, for example in the .png format;
- split the atlas into the individual sprites using the Sprite Editor; at this point, in the Project View an arrow is shown on the imported sprite, to indicate that it is a collection of sprites;
- select the sprites that are part of a complete animation sequence and drag and drop them on the Hierarchy Window. Unity will open a dialog to create and save the animation on a file with the .anim extension. A sprite object is created on the scene. At the same time, Unity also creates the Animator controller and adds the Animator component to the object. Running the game will play all the images in the sequence;
- if necessary, modify the Animation controller parameters to adjust speed, animation looping, keyframes, etc.;
- to move the object prepare a script associated with it.
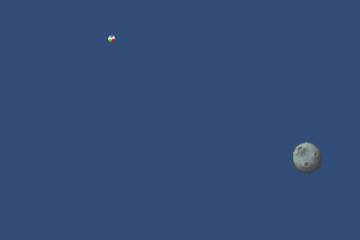
The following image presents a simple animation of a sprite sheet. An associated script controls the horizontal movement and the collision with the side walls.
Of course, you can make more complex animations. A classic example is to have various collections of sprites related to different states of a character: idle, walk, run, attack, die. A different animation is created for each of the collections. Each animation corresponds to a different state and these animations can be coordinated by an Animator Controller, which is nothing more than a finite state machine, as we will see later.
For further information on animation with Unity see [4] or [5].
5) Animator as a finite state machine
As we have seen, finite state machines are part of the Unity animation system. However, they can also be implemented without animation.
The Animator of the Mecanim animation system is in fact a finite state machine, capable of managing different states and passing from one state to another through transitions. The steps to control the behavior of an object using a simple finite state machine based on the Unity Animator are as follows:
- create a GameObject;
- create an Animator Controller;
- define states, transitions and parameters;
- create Behaviour scripts associated with states;
- in the script associated with the GameObject, include the control of the parameters to be communicated to the Animator (e.g. controlling the colors of the traffic light, the distance of a player, etc.).
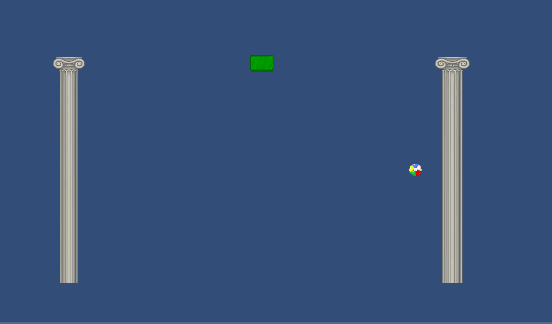
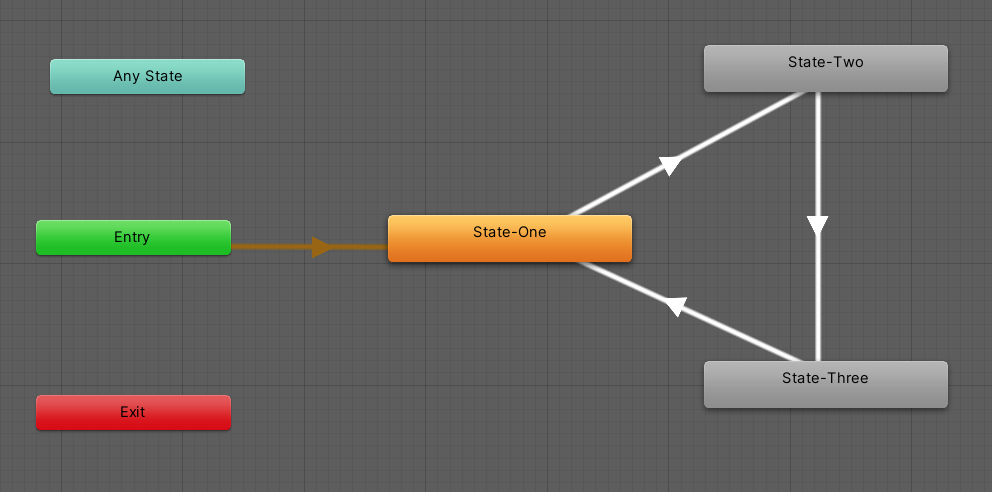
The following image is a simple example of animation obtained using the Animator as a finite state machine. An object, in this case a ball, can be in three different states: stationary, low speed, high speed, depending on the color of the traffic light. Three transitions are defined for switching between states when there is a change in the traffic light. Despite its simplicity, the example contains the essential ingredients of each finite state machine: an object that can be in different states and passes from one state to another according to changes in the external environment.
Of course, other more interesting objects can be used instead of the ball: a character who regulates his state of motion according to the traffic light, a car, a mechanical device, etc.
Conclusion
Animation is a complex and fundamental topic for the development of interesting and sophisticated video games, which are capable of effectively simulating the real world. In subsequent articles we will explore the various types of animation and will describe the mathematical tools that underlie the sophisticated algorithms used in modern video games.
Bibliography
[1]V. Bruce, M. Georgeson, P. Green – Visual Perception: Physiology, Psychology and Ecology (Psychology Press)
[2]D. Hubel – Eye, Brain, and Vision (Freeman & Co)
[3]Jason Gregory – Game Engine Architecture (CRC Press, 2014)
[4]A. Godbold, S. Jackson – Mastering Unity 2D Game Development (Packt Publishing)
[5]A. Thorn – Unity Animation Essentials (Packt Publishing)

0 Comments